In this post, we’re going to be creating a simple Employee database using Node, Express and MongoDB. By the end of this tutorial, you should be able to save a new employee and display all saved employees.
Getting Started
MongoDB
Installation and configuration of MongoDB is beyond the scope of this post. You can download MongoDB from their downloads page. For configuration and help getting Mongo started I’d suggest you read this tutorial. Again, this is assuming your using OS X. Make sure you have MongoDB up and running before you continue.
Express
Express is an incredible Node.js web application framework. It organizes your web app into an MVC architecture on the server side. To install Express, run the following code in Terminal:
Express is an incredible Node.js web application framework. It organizes your web app into an MVC architecture on the server side. To install Express, run the following code in Terminal:
// You may need to run this under sudo
npm install express -g
To automatically build out an application template for your application, navigate to the directory where you wish to create your application and run the following code:
mkdir EmployeeDB
cd EmployeeDB
express -c stylus
npm install -d
What this does is:
- create the directory for your application.
- create your application template using the jade template engine and the stylus css engine.
You should now be able to run your application and see a generic Express application.
node app.js
Creating our Employee Database
First thing we need to do is install a dependency on MongoDB, which will allow our application to access mongoDB. Open your
First thing we need to do is install a dependency on MongoDB, which will allow our application to access mongoDB. Open your
package.json and add the following code:{
"name": "application-name",
"version": "0.0.1",
"private": true,
"scripts": {
"start": "node app"
},
"dependencies": {
"express": "3.1.0",
"jade": "*",
"stylus": "*",
"mongodb": ">= 0.9.6-7"
}
}
Everything should have already been there with the exception of
"mongodb": ">= 0.9.6-7". Once you have saved the file run the following code to download and install the nodejs client for mongoDB:npm install -d
Now we need to create our provider that will be capable to using MongoDB. Make sure this file is located in the same directory as app.js.
employeeprovider.js
var Db = require('mongodb').Db;
var Connection = require('mongodb').Connection;
var Server = require('mongodb').Server;
var BSON = require('mongodb').BSON;
var ObjectID = require('mongodb').ObjectID;
EmployeeProvider = function(host, port) {
  this.db= new Db('node-mongo-employee', new Server(host, port, {safe: false}, {auto_reconnect: true}, {}));
  this.db.open(function(){});
};

EmployeeProvider.prototype.getCollection= function(callback) {
  this.db.collection('employees', function(error, employee_collection) {
    if( error ) callback(error);
    else callback(null, employee_collection);
  });
};
//find all employees
EmployeeProvider.prototype.findAll = function(callback) {
    this.getCollection(function(error, employee_collection) {
      if( error ) callback(error)
      else {
        employee_collection.find().toArray(function(error, results) {
          if( error ) callback(error)
          else callback(null, results)
        });
      }
    });
};
//save new employee
EmployeeProvider.prototype.save = function(employees, callback) {
    this.getCollection(function(error, employee_collection) {
      if( error ) callback(error)
      else {
        if( typeof(employees.length)=="undefined")
          employees = [employees];

        for( var i =0;i< employees.length;i++ ) {
          employee = employees[i];
          employee.created_at = new Date();
        }

        employee_collection.insert(employees, function() {
          callback(null, employees);
        });
      }
    });
};

exports.EmployeeProvider = EmployeeProvider;
As you can see, we declare all the necessary variables needed to access MongoDB. You’ll also see the
The
getCollection method. A collection is a logical grouping of similar documents. MongoDB doesn’t have any tables; instead it contains collections. By calling collection on the db object, MongoDB will create the collection from scratch and return it. If the collection already exists it will simply return a reference to it. In our application, our collection will be called employees.The
findAll method returns all employees in the collection and the save method saves a new employee to our collection. Our employee datatype will look like this:{
_id: 0,
title: '',
name: '',
created_at: new Date()
}
app.js
Open
Open
app.js, which should have been created by default, and add the following code:
/**
 * Module dependencies.
 */
var express = require('express')
  , routes = require('./routes')
  , user = require('./routes/user')
  , http = require('http')
  , path = require('path')
  , EmployeeProvider = require('./employeeprovider').EmployeeProvider;
var app = express();

app.configure(function(){
  app.set('port', process.env.PORT || 3000);
  app.set('views', __dirname + '/views');
  app.set('view engine', 'jade');
  app.set('view options', {layout: false});
  app.use(express.favicon());
  app.use(express.logger('dev'));
  app.use(express.bodyParser());
  app.use(express.methodOverride());
  app.use(app.router);
  app.use(require('stylus').middleware(__dirname + '/public'));
  app.use(express.static(path.join(__dirname, 'public')));
});

app.configure('development', function(){
  app.use(express.errorHandler());
});
var employeeProvider= new EmployeeProvider('localhost', 27017);
//Routes

app.get('/', function(req, res){
  employeeProvider.findAll(function(error, emps){
      res.render('index', {
            title: 'Employees',
            employees:emps
        });
  });
});

app.get('/employee/new', function(req, res) {
    res.render('employee_new', {
        title: 'New Employee'
    });
});
//save new employee
app.post('/employee/new', function(req, res){
    employeeProvider.save({
        title: req.param('title'),
        name: req.param('name')
    }, function( error, docs) {
        res.redirect('/')
    });
});

app.listen(3000);
Most of the code should have already been created for you with the exception of the routes. The following line declares our EmployeeProvider which will access MongoDB:
EmployeeProvider = require('./employeeprovider').EmployeeProvider
The first route,
'/', will retrieve all the employees from our employeeProvider and pass them to the index view. The second route, '/employee/new' will render the employee_new view which will display a form to the user. The last route will call the save method in our employeeProviderto save a new employee.
Views
Our views will be using the jade template engine. If you are not familiar with Jade I suggest you become familiar with it before moving on. Jade provides a syntax for declaring markup with a minimum of typed characters. It basically takes HTML, simplifies it and makes it readable. You can say goodbye to closing tags! Indentation/Spacing is very important in Jade. Indentation reflects nesting. The hierarchy of elements is expressed as indentation on the left hand-side. I spent hours trying to figure out why my Jade templates weren’t rendering only to find out my indentation was invalid. I’ll explain in a minute. First, lets create our Jade templates.
index.jade
extends layout

block content
    h1= title
    #employees
        - each employee in employees
          div.employee
            div.created_at= employee.created_at
            div.title= employee.title
            div.name= employee.name
        a(href="/employee/new")!= "Add New Employee"
The first thing you’ll notice is
extends layout and block content. The extends portion expresses what layout it belongs to similar to a master page in ASP.NET. The block portion declares what blocks it extends, which means a template can add markup to more than one part of the layout. Lets look at the layout:
layout.jade
doctype 5
html
  head
    title= title
    link(rel='stylesheet', href='/stylesheets/style.css')
  body
    block content
The block in
index.jade must be the parent of everything within it meaning it must be at the far left of your document. Everything within it must be indented. This was the error I had when my jade templates weren’t loading. Like I said before, indentation is very important in Jade.
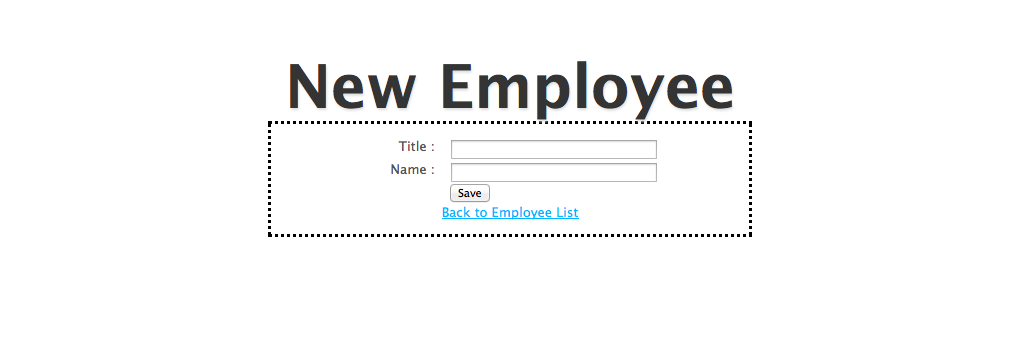
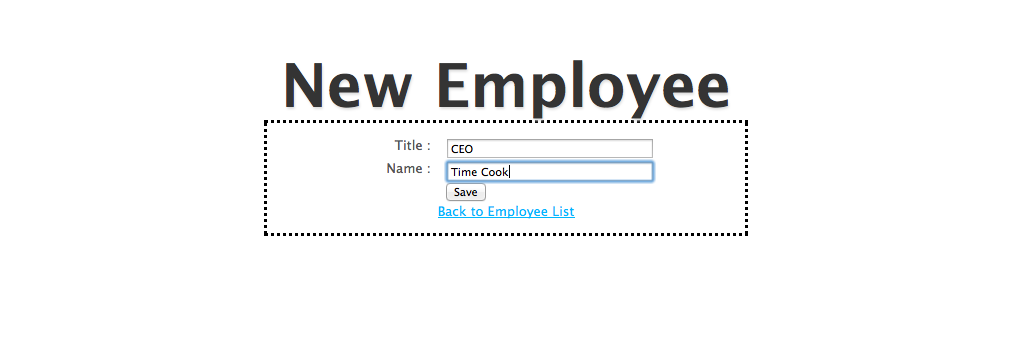
employee_new.jade
extends layout

block content
    h1= title
    div.newemployee
        form( method="post")
            div
                div
                    span.label Title :
                    input(type="text", name="title", id="editEmployeeTitle")
                div
                    span.label Name :
                    input(type="text", name="name", id="editEmployeeName")
                div#editEmployeeSubmit
                    input(type="submit", value="Save")
        a(href="/")!= "Back to Employee List"
Stylesheets
The default stylesheet has already been populated for us in `public/styesheets/style.styl’. The stylesheet uses the stylus css engine. Stylus is to CSS as Jade is to HTML.
body
  padding: 50px
  font: 14px "Lucida Grande", Helvetica, Arial, sans-serif
  font-size 13px
  text-align center
  text-stroke 1px rgba(255, 255, 255, 0.1)
  color #555
a
  color: #00B7FF
h1, h2
  margin 0
  font-size 22px
  color #343434
h1
  text-shadow 1px 2px 2px #ddd
  font-size 60px
#employees
  text-align left
  margin-left auto
  margin-right auto
  width 320px
  .employee
    margin 20px
    .created_at
        display none
    .title
        font-weight bold
        background-color #eee
    .name
        background-color #ffa
.newemployee
    border 3px
    border-color #000
    border-style dotted
    width 450px
    margin-left auto
    margin-right auto
    padding 14px
  input[type =text]
    width 200px
    margin-left 16px
    float left
  input[type =button], input[type =submit]
    clear both
    text-align left
    margin-left 165px
    display block
  .label
      width 150px
      text-align right !important
      display block
      float left
You can now re-run your application and navigate to localhost:3000. Make sure you have MongoDB up and running. For help running MongoDB, please refer to this tutorial.
node app.js

In my next post, part 2, we’ll add the ability to edit and delete employees. I’ll also be posting the source code in part 2. Stay tuned.
No comments:
Post a Comment