Showing posts with label Tutorials. Show all posts

Monday, 24 June 2019

Get started with Libra: My First Transaction

Owner : https://medium.com/@techgeek628/get-started-with-libra-my-first-transaction-5b3c20352d6c

This article will guide you through executing your first transaction on the Libra Blockchain.
Clone the Libra Core Repository:
git clone https://github.com/libra/libra.git
Change to the libra directory
cd libra
Setup Libra Core:
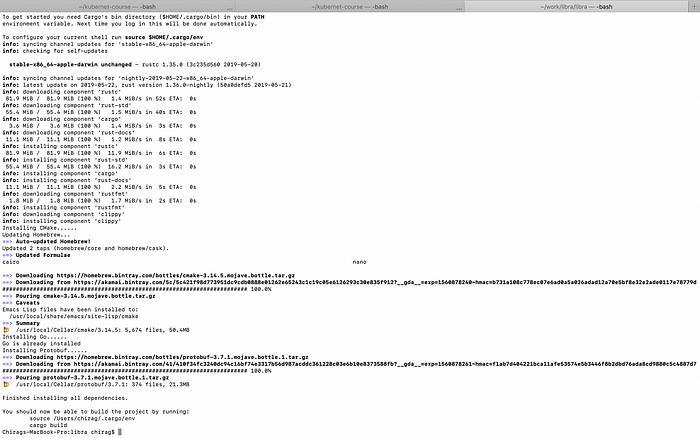
To setup Libra Core, run the setup script to install the dependencies
./scripts/dev_setup.sh
The setup script performs these actions:
  1. Installs rustup — rustup is an installer for the Rust programming language, which Libra Core is implemented in.
  2. Installs the required versions of the rust-toolchain.
  3. Installs CMake — to manage the build process.
  4. Installs protoc — a compiler for protocol buffers.
  5. Installs Go — for building protocol buffers.
Build Libra CLI Client and Connect to the Testnet
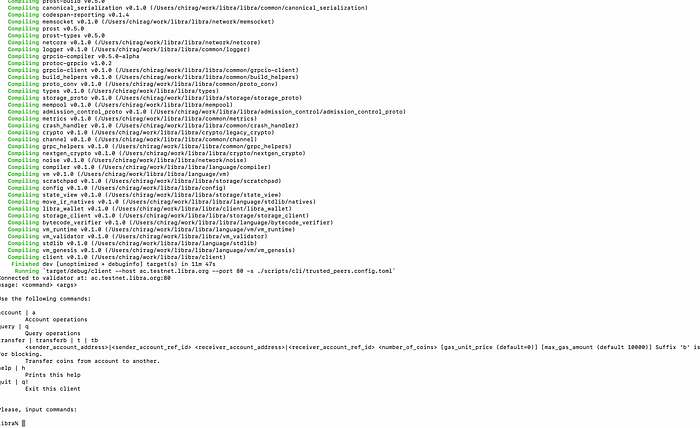
To connect to a validator node running on the Libra testnet, run the client as shown below.
./scripts/cli/start_cli_testnet.sh
Once the client connects to a node on the testnet, you will see the following output.
Check If the CLI Client Is Running on Your System:
To see the help information for the account command enter “account” as shown below:
Create Alice’s Account
To create Alice’s account, enter this command:
libra% account create
Sample output on success:
>> Creating/retrieving next account from wallet
Created/retrieved account #0 address 5993ea6f4632fb962be6e7ac019f4257c2f14fdf14e5a4ee3be0f681e54a7b5e
#0 is the index of Alice’s account, and the hex string is the address of Alice’s account.
Create Bob’s Account:
To create Bob’s account, repeat the account creation command:
libra% account create
Sample output on success:
>> Creating/retrieving next account from wallet
Created/retrieved account #1 address cff7b9ba48d423dfc04e0a7d0b7ecdd035e6df08157782fd70405430c63ca2d1
#1 is the index for Bob’s account, and the hex string is the address of Bob’s account.
List Accounts:
libra% account list
Sample output on success:
User account index: 0, address: 5993ea6f4632fb962be6e7ac019f4257c2f14fdf14e5a4ee3be0f681e54a7b5e, sequence number: 0, status: Local
User account index: 1, address: cff7b9ba48d423dfc04e0a7d0b7ecdd035e6df08157782fd70405430c63ca2d1, sequence number: 0, status: Local
The sequence number for an account indicates the number of transactions that have been sent from that account.
Add 110 Libra to Alice’s Account:
libra% account mint 0 110
  1. 0 is the index of Alice’s account.
  2. 110 is the amount of Libra to be added to Alice’s account.
Sample output on success:
>> Minting coins
Mint request submitted
Add 52 Libra to Bob’s Account
libra% account mint 1 52
Sample output on success:
>> Minting coins
Mint request submitted
Check the Balance:
To check the balance in Alice’s account, enter this command:
libra% query balance 0
Sample output on success:
Balance is: 110
To check the balance in Bob’s account, enter this command:
libra% query balance 1
Sample output on success:
Balance is: 52
Query the Accounts’ Sequence Numbers
libra% query sequence 0
>> Getting current sequence number
Sequence number is: 0libra% query sequence 1
>> Getting current sequence number
Sequence number is: 0
A sequence number of 0 for both Alice’s and Bob’s accounts indicates that no transactions from either Alice’s or Bob’s account have been executed so far.

Submit a Transaction

Before we submit a transaction to transfer Libra from Alice’s account to Bob’s account, we will query the sequence number of each account. This will help us understand how executing a transaction changes the sequence number of each account.
libra% query sequence 0
>> Getting current sequence number
Sequence number is: 0libra% query sequence 1
>> Getting current sequence number
Sequence number is: 0
Transfer Money
libra% transfer 0 1 10
Sample output on success:
>> Transferring
Transaction submitted to validator
To query for transaction status, run: query txn_acc_seq 0 0 <fetch_events=true|false>
0 is the index of Alice’s account. 1 is the index of Bob’s account. 10 is the number of Libra to transfer from Alice’s account to Bob’s account.
Retrieve the information about the transaction :
libra% query txn_acc_seq 0 0 true
Sample output on success:

Getting committed transaction by account and sequence number
Committed transaction: SignedTransaction { 
 raw_txn: RawTransaction { 
 sender: 5993ea6f4632fb962be6e7ac019f4257c2f14fdf14e5a4ee3be0f681e54a7b5e, 
 sequence_number: 0, 
 payload: {, 
 transaction: peer_to_peer_transaction, 
 args: [ 
 {ADDRESS: cff7b9ba48d423dfc04e0a7d0b7ecdd035e6df08157782fd70405430c63ca2d1},
 {U64: 10000000}, 
 ]
 }, 
 max_gas_amount: 10000, 
 gas_unit_price: 0, 
 expiration_time: 1560880276s, 
}, 
 public_key: 09434588784ea49844e622c023df9e1fa3c52ff7ca7e51f970fc80c2bd2e759c, 
 signature: Signature( R: CompressedEdwardsY: [202, 230, 255, 181, 94, 160, 144, 218, 61, 165, 204, 18, 156, 164, 154, 222, 187, 79, 165, 183, 153, 32, 183, 47, 187, 95, 208, 182, 159, 226, 127, 91], s: Scalar{
 bytes: [100, 247, 195, 92, 83, 157, 100, 112, 110, 203, 47, 167, 86, 75, 239, 138, 8, 119, 71, 255, 15, 87, 157, 158, 59, 154, 160, 45, 42, 24, 101, 4],
} ), 
 }
Events: 
ContractEvent { access_path: AccessPath { address: 5993ea6f4632fb962be6e7ac019f4257c2f14fdf14e5a4ee3be0f681e54a7b5e, type: Resource, hash: “217da6c6b3e19f1825cfb2676daecce3bf3de03cf26647c78df00b371b25cc97”, suffix: “/sent_events_count/” } , index: 0, event_data: AccountEvent { account: cff7b9ba48d423dfc04e0a7d0b7ecdd035e6df08157782fd70405430c63ca2d1, amount: 10000000 } }
ContractEvent { access_path: AccessPath { address: cff7b9ba48d423dfc04e0a7d0b7ecdd035e6df08157782fd70405430c63ca2d1, type: Resource, hash: “217da6c6b3e19f1825cfb2676daecce3bf3de03cf26647c78df00b371b25cc97”, suffix: “/received_events_count/” } , index: 0, event_data: AccountEvent { account: 5993ea6f4632fb962be6e7ac019f4257c2f14fdf14e5a4ee3be0f681e54a7b5e, amount: 10000000 } }
libra%
Query Sequence Number After Transfer
libra% query sequence 0
>> Getting current sequence number
Sequence number is: 1libra% query sequence 1
>> Getting current sequence number
Sequence number is: 0
The sequence number of 1 for Alice’s account (index 0) indicates that one transaction has been sent from Alice’s account so far.
Check the Balance in Both Accounts After Transfer
libra% query balance 0
Balance is: 100libra% query balance 1
Balance is: 62
Congratulations! You have successfully executed your transaction on the Libra testnet and transferred 10 Libra from Alice’s account to Bob’s account!

Friday, 21 June 2019

Libra First Impressions


Part 1: Smart Contracts are not created equal
One of the most anticipated tech stories of the year is Facebook’s cryptocurrency — the Libra project. On June 18th, 2019, Facebook released the Libra white paper with the first iteration of the project source code and a technical white paper. With a goal of a denationalized global currency (Hayek 1976), Libra project has ambitious cryptoeconomic designs, governance rules, and an impressive coalition of partners.
The Libra Blockchain is a decentralized, programmable database designed to support a low-volatility cryptocurrency that will have the ability to serve as an efficient medium of exchange for billions of people around the world. — Libra white paper.
However, as technologists, we are most interested in Libra’s approach to the blockchain technology itself. Why does Libra require its own blockchain? What are the opportunities for application developers? What’re its implications for businesses and traditional IT? In this 3 part article tutorial, we will first review Libra’s approach to application development, then provide a deep dive into one of Libra’s core applications, and finally, guide you through a tutorial on how to create your own applications.
This article series is produced by Second State, a VC-funded, enterprise-focused, smart contract platform company. We are still in stealth mode while making contributions to leading open source projects. We are launching our first products soon.

The smart contract first approach

One of the most striking design features of Libra is its “smart contract first”approach. One could argue that even on a smart contract platform like Ethereum, smart contract executions are just one type of transactions. Ethereum’s “native” operations are still coin transactions. Libra is different. Smart contracts are first class citizens on Libra.
The Libra blockchain itself is written in Rust, but Libra applications are written in a new programming language called Move. All external interactions with the Libra blockchain are handled by Move programs. On Libra, even a coin transfer is handled by a Move program. Each Libra node runs a virtual machine that executes Move programs and records results when a consensus is reached.
We believe this “smart contract first” approach enables Libra to build a versatile infrastructure that can adapt to future needs.

Why Move?

So, why do we need a new programming language? We need it for security and performance. Libra is building a blockchain because the current blockchain solutions on the market do not meet its performance and security goals.
Facebook and Libra want to build a blockchain that is focused on payment and digitalization of assets. So, they created a programming language that has built-in support for immutable and non-duplicable assets. Move is a DSL (Domain Specific Language) for digital asset management.
Bitcoin is a remarkable cryptographic achievement and the ability to create something that is not duplicable in the digital world has enormous value. — Eric Schmidt, Google Chairman.
The Move language got its name from a basic operator supported by the language itself. The move operator is responsible for moving assets. It eliminates the two-step operation of subtracting from one account first and then adding to another account. The language is designed to treat assets and resources as first-class constructs. Of course, Move has other important features that make it secure and robust for asset management.
  • The Move language is static typed and checked by the compiler tools for errors and potential issues.
  • Move source code is compiled into a static typed IR (intermediate representation) code to be executed by the virtual machine. The IR code can also be checked and verified for correctness by tools.
In fact, the current Libra documentation only has Move IR examples. The Move source specification has not been released at the time of this article.
The Move language and virtual machine are the key innovations from the Libra project. But, what are the compromises Move has to make compared with traditional smart contract languages like Solidity and Vyper, and blockchain virtual machines like the Ethereum Virtual Machine and WebAssembly?

The Turing completeness trade-off

Most DSL systems are optimized for specific tasks and hence are not suitable for general computing. The Libra project does not explicitly state whether Move will be a Turning complete system. But by optimizing for financial transactions, the Move system is probably not well equipped for, say, cryptocurrency gaming and gambling.
However, that also means that the Libra software is not well suited for most enterprise smart contract use cases.
But there are more. In many ways, Move programs are not smart contracts at all.

Are Move programs really smart contracts?

Move programs must be compiled and built into the Libra node software in order for them to be available to users. For a Libra blockchain to support new Move programs, it must stop and ⅔ of all validator nodes must all upgrade their software to support the same MOVE programs. That essentially means a hard fork with service downtime for every Move program to be added to the blockchain platform. That is not smart contract. That is chaincode.
A defining characteristic of smart contracts is the ability to deploy and execute new code on-demand onto the blockchain through consensus without any downtime. That is especially for public or enterprise blockchains.
  • Public blockchains must allow anyone to deploy and execute smart contract code without permission or service disruption.
  • Enterprise blockchains typically utilize smart contracts to make automated business decisions, such as escrowing between parties. Employees and partners must be able to change and deploy contracts as needed without disruption.
As a permissioned blockchain focused on financial transactions, Libra’s initial approach with fixed chaincode could make the system safer and more stable as all Move programs will be reviewed and approved by 67 out of 100 validators. But Libra’s stated goal is to evolve into a public blockchain over the 5 years. We believe that the Move architecture will have to evolve with it.

Stay tuned

In this article, we focused on the Move programming language and the smart contracts it enables. Of course, Libra has other interesting technology innovations. Here are a few notable ones.
  • Unlike Ethereum, where each node maintains a global state DB that gets updated after each block, Libra features a versioned state DB. The Libra state DB gets updated after every transaction. The concept of “block” is much less important than “transaction” in Libra.
  • The Libra blockchain’s stated initial performance goal is 1000 TPS (transactions per second). That is certainly enough for a global payment (or e-commerce) startup as the VISA network averages about 1700 TPS. There is no unrealistic and irresponsible boasting of “million TPS”.

    Owner: https://hackernoon.com/libra-first-impressions-ed6b5f15ae63

Friday, 12 July 2013

A JSON Tutorial. Getting started with JSON using JavaScript and jQuery

Javascript has grown from a way to add interactivity on your page, to a language that lets you perform tasks that once belonged to servers. JSON provides for an easy way to create and store data structures within JavaScript. It’s super popular and a great alternative to XML. JSON stands for JavaScript Object Notation…it’s called that because storing data with JSON creates a JavaScript object. The JavaScript object can be easily parsed and manipulated with JavaScript.
Where XML is arguably easier to read, but notoriously difficult to parse (describe to a computer), JSON makes it a breeze to store data in a format that machines dig. Once you encode the data with JSON, you can read it into a variable which creates an object. Really cool stuff. Let’s take a look.
<script>
    var data={ "firstName" : "Ray" };
    alert(data.firstName);
</script>

Breaking JSON down

First, we create a variable to hold our data, and then we use JSON to define our object. Our sample object above is a simple as it gets. Just an item called firstName and it’s value Ray. When using strings with JSON, you should use them with quotations as above. If you use numbers, then you don’t have to use quotations.
This example will cause your browser to alert you with the variable name.
Creating a JSON object is easy

Creating an object placeholder

That’s great. Let’s go ahead and make it a bit more realistic by inserting our JSON data into an object in the DOM.
<div id="placeholder"></div>
    <script>
        var data={"firstName":"Ray"};
        document.getElementById("placeholder").innerHTML=data.firstName;
    </script>
So now at least we’re putting the data inside an HTML element instead of an alert. The JSON data, of course can be much more complex. Let’s try adding some more fields.
<div id="placeholder"></div>
<script>
  var data={
    "firstName":"Ray",
    "lastName":"Villalobos",
    "joined":2012
  };
  document.getElementById("placeholder").innerHTML=data.firstName+" "+data.lastName+" "+data.joined;
</script>
A couple of things about these changes…First, you’ll see that we added a bit of formatting to our JSON data. That’s just to make sure it’s easier to read for humans; you’ll often find JSON data formatted in this manner. The second thing is that the “joined” value (2012) didn’t need quotations because its a number. That’s still pretty simple data. Let’s try something more complex.

Adding Arrays

What if we wanted to enter a bunch of people…then we have to add array notation. You create arrays in JSON using brackets []. Let’s see how our data would look for a couple of users.
<div id="placeholder"></div>
<script>
var data={"users":[
        {
            "firstName":"Ray",
            "lastName":"Villalobos",
            "joined":2012
        },
        {
            "firstName":"John",
            "lastName":"Jones",
            "joined":2010
        }
]}

document.getElementById("placeholder").innerHTML=data.users[0].firstName + " " + data.users[0].lastName+" "+ data.users[0].joined;
</script>
This looks more complicated, but it’s not really too hard to understand. Every object in jason is stored with curly braces {}, an array is stored with brackets[]. So in order to organize our data, we created an object called users, which held an array (using brackets). That object had a couple of other objects…each stored like before with curly braces {}. Each element in that object was separated by commas.
Notice that we obviously had to change our code for inserting the name. We had to include the new users object and then specify bracket notation to specify our first element in the array. Let’s add another level of complexity to our data structure just for kicks.
<div id="placeholder"></div>
<script>
    var data={"users":[
            {
                "firstName":"Ray",
                "lastName":"Villalobos",
                "joined": {
                    "month":"January",
                    "day":12,
                    "year":2012
                }
            },
            {
                "firstName":"John",
                "lastName":"Jones",
                "joined": {
                    "month":"April",
                    "day":28,
                    "year":2010
                }
            }
    ]}

    document.getElementById("placeholder").innerHTML=data.users[0].firstName + " " + data.users[0].lastName+"--"+ data.users[0].joined.month;
</script>
Simple JSON Output
Just one tiny level of complexity. We just added multiple fields to the joined object. We didn’t need an array here, just a series of objects, so we used the object notation. This is great and we’ve got some pretty good data, but now that we have multiple users, it’s time to go through each user and output them into a list.

Traversing the user list

So, if we want to go through the user list, we could simply use JavaScript’s for statement to take care of that. We’ll put the items inside a list.
<div id="placeholder"></div>
<script>
    var data = { "users":[
            {
                "firstName":"Ray",
                "lastName":"Villalobos",
                "joined": {
                    "month":"January",
                    "day":12,
                    "year":2012
                }
            },
            {
                "firstName":"John",
                "lastName":"Jones",
                "joined": {
                    "month":"April",
                    "day":28,
                    "year":2010
                }
            }
    ]}

    var output="<ul>";
    for (var i in data.users) {
        output+="<li>" + data.users[i].firstName + " " + data.users[i].lastName + "--" + data.users[i].joined.month+"</li>";
    }
    output+="</ul>";

    document.getElementById("placeholder").innerHTML=output;
</script>
So here, we use a for statement and created a variable called output to temporarily store the data. Once we go through all of the elements in the array, we use the output variable to populate the placeholder div. That works well, but as you can tell, our data structure is getting a little long.

Reading JSON from an external file

It would be nice if we could store this on an external file and then just read everything into the data variable. To make things easier, I’m going to use jQuery, so we’ll have to load that library first and then call it’s getJSON function. Here’s what our entire page’s code looks like.
<!DOCTYPE html>
<html lang="en">
<head>
    <meta charset="utf-8" />
    <title>JSON Sample</title>
</head>
<body>
    <div id="placeholder"></div>
    <script src="http://code.jquery.com/jquery-1.7.1.min.js"></script>
    <script>
  $.getJSON('data.json', function(data) {
        var output="<ul>";
        for (var i in data.users) {
            output+="<li>" + data.users[i].firstName + " " + data.users[i].lastName + "--" + data.users[i].joined.month+"</li>";
        }

        output+="</ul>";
        document.getElementById("placeholder").innerHTML=output;
  });
    </script>
</body>
</html>
The resulting output from our final document
Pretty much the same code as before without the data file. We just wrap everything inside jQuery’s getJSON function, which does the hard job of reading the file. Assuming the file is in the same directory here’s what our new data.json file looks like.
{"users":[
        {
            "firstName":"Ray",
            "lastName":"Villalobos",
            "joined": {
                "month":"January",
                "day":12,
                "year":2012
            }
        },
        {
            "firstName":"John",
            "lastName":"Jones",
            "joined": {
                "month":"April",
                "day":28,
                "year":2010
            }
        }
]}
Pretty much as before. As you can see, JSON is really easy to read and once you get used to the curly braces and brackets, not too hard to encode.